By creating multiple VMKernel NICs it makes it possible to have multiple paths to iSCSI SAN storage and utilize MPIO.
However to do this and implement certain performance tweaks this has to be done partly via the GUI and partly via the service console. Hopefully in the future VMware will implement additions to the GUI to allow this.
While you may have several physical network adaptors connected to a vSwitch (in this case a distributed vSwitch - DVS), the VMkernel ports are required to make different connections/sessions to the iSCSI SAN storage device(s).
In this case it is used to configure MPIO via ESX 4 and a Dell EqualLogic PS SAN array. However the process should be similar if not the same for other vendor iSCSI SAN storage.
1. Set physical switch ports to MTU 9000
For example on Cisco 3750/3560 switches:
3750(config)# system mtu jumbo 9000
3750(config)# exit
3750# reload
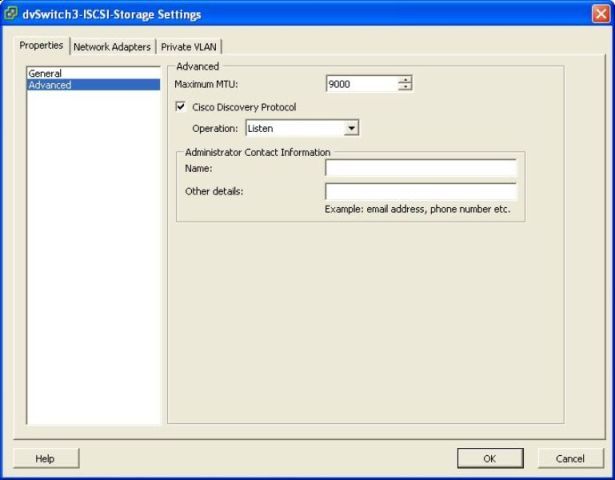
2. Set DVS to MTU 9000
In vCenter go to Home --> Networking.
Create or click on the Distributed Virtual Switch (DVS) that is being used for ISCSI storage.
3. Create VMKNICs via GUI (Defaults to MTU 1500)
How to create a VMKernel port.
If you already have created 1 or more VMkernel ports continue...
4. Logon to the ESX service console and list the VMkernel interfaces.
Take note of the IP addresses.
/usr/sbin/esxcfg-vmknic -l
Interface Port Group/DVPort IP Family IP Address Netmask Broadcast MAC Address MTU TSO MSS Enabled Type
vmk0 56 IPv4 10.1.1.50 255.255.255.0 10.1.1.255 00:50:56:3b:02:8c 1500 65535 true STATIC
vmk1 57 IPv4 10.1.1.51 255.255.255.0 10.1.1.255 00:50:56:37:09:82 1500 65535 true STATIC
vmk2 58 IPv4 10.1.1.52 255.255.255.0 10.1.1.255 00:50:56:3c:6e:72 1500 65535 true STATIC
vmk3 59 IPv4 10.1.1.53 255.255.255.0 10.1.1.255 00:50:56:3d:ef:7d 1500 65535 true STATIC
5. List the vSwitch details
Take note of the DVPort ID for each VMKernel (vmk#) NIC
/usr/sbin/esxcfg-vswitch -l
DVS Name Num Ports Used Ports Configured Ports Uplinks
dvSwitch3-ISCSI-Storage 256 7 256 vmnic7,vmnic3
DVPort ID In Use Client
131 1 vmnic3
132 1 vmnic7
56 1 vmk0
57 1 vmk1
58 1 vmk2
59 1 vmk3
6. Delete the VMkernel NICs that were created previously.
This is so we can add them back with an MTU of 9000, the GUI does not allow this. We also need a DV Port ID to create it via the service console.
/usr/sbin/esxcfg-vmknic -d -s dvSwitch3-ISCSI-Storage -v 56
/usr/sbin/esxcfg-vmknic -d -s dvSwitch3-ISCSI-Storage -v 57
/usr/sbin/esxcfg-vmknic -d -s dvSwitch3-ISCSI-Storage -v 58
/usr/sbin/esxcfg-vmknic -d -s dvSwitch3-ISCSI-Storage -v 59
7. Create VMKNICs with MTU 9000
Using the DV Port ID recorded previously we create the VMkernel port with an MTU of 9000 (for jumbo frames)
/usr/sbin/esxcfg-vmknic -a -i 10.1.1.50 -n 255.255.255.0 -m 9000 -s dvSwitch3-ISCSI-Storage -v 56
/usr/sbin/esxcfg-vmknic -a -i 10.1.1.51 -n 255.255.255.0 -m 9000 -s dvSwitch3-ISCSI-Storage -v 57
/usr/sbin/esxcfg-vmknic -a -i 10.1.1.52 -n 255.255.255.0 -m 9000 -s dvSwitch3-ISCSI-Storage -v 58
/usr/sbin/esxcfg-vmknic -a -i 10.1.1.53 -n 255.255.255.0 -m 9000 -s dvSwitch3-ISCSI-Storage -v 59
8. Confirm the VMkernel NIC settings:
/usr/sbin/esxcfg-vmknic -l
Interface Port Group/DVPort IP Family IP Address Netmask Broadcast MAC Address MTU TSO MSS Enabled Type
vmk0 56 IPv4 10.1.1.50 255.255.255.0 10.1.1.255 00:50:56:7b:02:8c 9000 65535 true STATIC
vmk1 57 IPv4 10.1.1.51 255.255.255.0 10.1.1.255 00:50:56:77:09:82 9000 65535 true STATIC
vmk2 58 IPv4 10.1.1.52 255.255.255.0 10.1.1.255 00:50:56:7c:6e:72 9000 65535 true STATIC
vmk3 59 IPv4 10.1.1.53 255.255.255.0 10.1.1.255 00:50:56:7d:ef:7d 9000 65535 true STATIC
9. Test that the VMkernel settings with an MTU of 9000 is working correctly:
/usr/sbin/vmkping -s 9000 10.1.1.200
PING 10.1.1.200 (10.1.1.200): 9000 data bytes
9008 bytes from 10.1.1.200: icmp_seq=0 ttl=255 time=0.533 ms
9008 bytes from 10.1.1.200: icmp_seq=1 ttl=255 time=0.501 ms
9008 bytes from 10.1.1.200: icmp_seq=2 ttl=255 time=0.518 ms
10. View SCSI adaptors and confirm the adaptor used for ISCSI
/usr/sbin/esxcfg-scsidevs -a
vmhba0 mpt2sas link-n/a sas.5a4badb00ecf3400 (3:0.0) LSI Logic / Symbios Logic Dell PERC H200 Integrated
vmhba1 lpfc820 link-n/a fc.20000000c996a8bd:10000000c996a8bd (4:0.0) Emulex Corporation LPe12000 8Gb Fibre Channel Host Adapter
vmhba2 lpfc820 link-n/a fc.20000000c99aed0c:10000000c99aed0c (5:0.0) Emulex Corporation LPe12000 8Gb Fibre Channel Host Adapter
vmhba3 ata_piix link-n/a sata.vmhba3 (0:31.2) Intel Corporation 2 port SATA IDE Controller (ICH9)
vmhba32 ata_piix link-n/a sata.vmhba32 (0:31.2) Intel Corporation 2 port SATA IDE Controller (ICH9)
vmhba33 iscsi_vmk link-n/a iqn.1998-01.com.vmware:starscream-2d842e60() Software iSCSI
11. List VMKNICs bound to the ISCSI software adaptor
/usr/sbin/esxcli swiscsi nic list -d vmhba33
No iSCSI Nics Found
12. Bind VMKNICs to the software ISCSI adaptor
Allow more sessions per datastore, and allow MPIO multiplathing.
/usr/sbin/esxcli swiscsi nic add -n vmk0 -d vmhba33
Errors:
Add Nic failed in IMA.
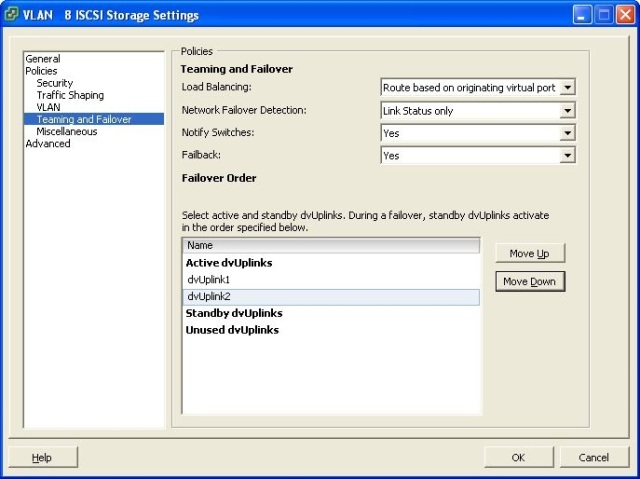
This error will occur when there is more than 1 physical uplink on the switch the VMkernel NIC is connected to.
Changing the vSwitch temporarily so there is only one active adaptor and the rest to unused, will allow the VMK to be bound to the software ISCSI adaptor.
/usr/sbin/esxcli swiscsi nic add -n vmk0 -d vmhba33
/usr/sbin/esxcli swiscsi nic add -n vmk1 -d vmhba33
/usr/sbin/esxcli swiscsi nic add -n vmk2 -d vmhba33
/usr/sbin/esxcli swiscsi nic add -n vmk3 -d vmhba33
13. Confirm that all VMkernel NICs were sucessfully bounded to the ISCSI adaptor.
/usr/sbin/esxcli swiscsi nic list -d vmhba3
vmk0
pNic name: vmnic3
ipv4 address: 10.1.1.50
ipv4 net mask: 255.255.255.0
ipv6 addresses:
mac address: b8:ac:6f:7f:ff:d8
mtu: 9000
toe: false
tso: true
tcp checksum: false
vlan: true
link connected: true
ethernet speed: 1000
packets received: 139011
packets sent: 17613
NIC driver: bnx2
driver version: 1.6.9
firmware version: 5.0.11 NCSI 2.0.5
vmk1
pNic name: vmnic3
ipv4 address: 10.1.1.51
ipv4 net mask: 255.255.255.0
ipv6 addresses:
mac address: b8:ac:6f:7f:ff:d8
mtu: 9000
toe: false
tso: true
tcp checksum: false
vlan: true
link connected: true
ethernet speed: 1000
packets received: 139011
packets sent: 17613
NIC driver: bnx2
driver version: 1.6.9
firmware version: 5.0.11 NCSI 2.0.5
vmk2
pNic name: vmnic3
ipv4 address: 10.1.1.52
ipv4 net mask: 255.255.255.0
ipv6 addresses:
mac address: b8:ac:6f:7f:ff:d8
mtu: 9000
toe: false
tso: true
tcp checksum: false
vlan: true
link connected: true
ethernet speed: 1000
packets received: 139011
packets sent: 17613
NIC driver: bnx2
driver version: 1.6.9
firmware version: 5.0.11 NCSI 2.0.5
vmk3
pNic name: vmnic3
ipv4 address: 10.1.1.53
ipv4 net mask: 255.255.255.0
ipv6 addresses:
mac address: b8:ac:6f:7f:ff:d8
mtu: 9000
toe: false
tso: true
tcp checksum: false
vlan: true
link connected: true
ethernet speed: 1000
packets received: 139011
packets sent: 17613
NIC driver: bnx2
driver version: 1.6.9
firmware version: 5.0.11 NCSI 2.0.5
14. Now change back the vSwitch settings so that any unused uplink adaptors active again.
15. On the ESX server Click "Rescan..." under the Configuration tab "Storage adaptors" section.
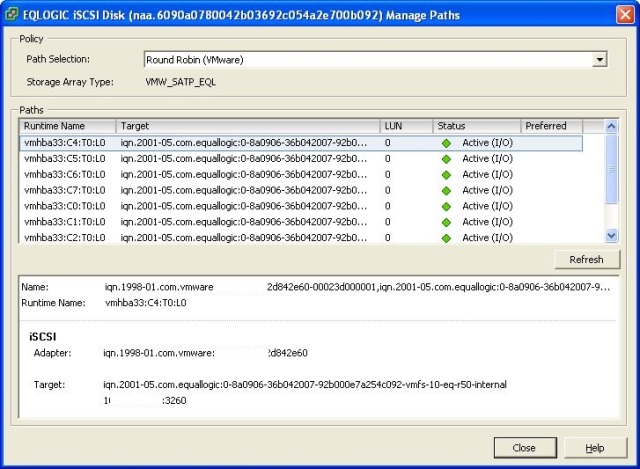
16. On each VMFS volume Click "Properties" and then "Manage Paths"
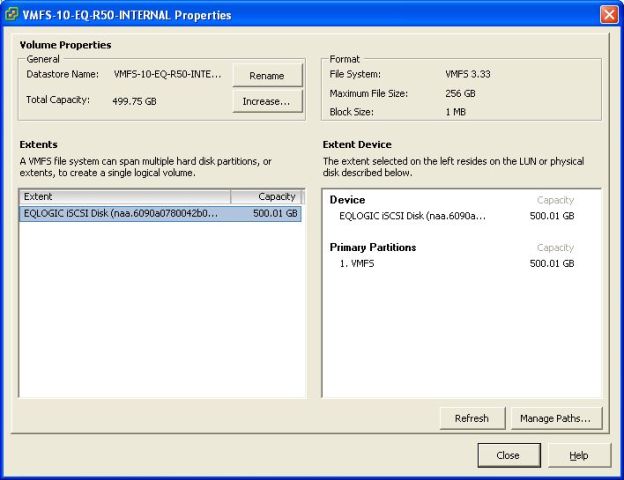
17. You will now see multiple paths to the VMFS datastore (LUN).
18. Change the path selection to "Round Robin (VMware)"
Share this blog post on social media:
Tweet


Latest Blog Posts
- vSphere 7 U1 - Part 3 - Creating a Datacenter, HA/DRS Cluster and Adding a Host
- vSphere 7 U1 - Part 2 - Deploying vCenter 7.0 U1 VCSA
- vSphere 7 U1 - Part 1 - Installing ESXi 7.0 U1
- Veeam CBT Data is Invalid - Reset CBT Without Powering Off VM
- View Administrator Blank Error Dialog/Window After Upgrade