vCenter Orchestrator (vCO) is a product which allows you to create tasks and automated workflows which and be run directly within vSphere Web Client or the vCenter Orchestrator Client.
There are a number of pre-made workflows to get your started, and the number of tasks you can perform is quite amazing. Any task that can be performed in vCenter can be automated through vCO, and thats just the start. Add some Active Directory integration, API's and other 3rd party plugin's makes this a pretty neat toolkit.
Workflows can be anything from simple workflows that contain a single task to say create a virtual machine, to complicated workflows containing many tasks that might build an entire solution and integrate with 3rd party plugins.
One of the best things about vCO is it's included with vCenter Server and it's free!
Welcome to Part 1 of my vCenter Orchestrator 5.5 How To Series
If you missed any of the previous parts of the series or want go back here is the jump list:
- vCenter Orchestrator (vCO) 5.5 - Part 1 Deploying the Virtual Appliance
- vCenter Orchestrator (vCO) 5.5 - Part 2 Configuring vCO
- vCenter Orchestrator (vCO) 5.5 - Part 3 Using vCO and Running a Workflow
- vCenter Orchestrator (vCO) 5.5 - Part 4 Adding a Workflow to a Context Menu
The latest version of vCenter Orchestrator (vCO) is 5.5.1 and has come on leaps and bounds since I originally saw it. This is my first proper look into vCO, it's features and it's going to take some time getting used to it. Not because it's difficult to use, more because the possibilities seem quite endless and understanding what cool things are possible might take some time to discover. However I did find it difficult to find a decent resource to quickly get it up and running and hopefully this blog will address that for others.
vCO can be deployed in a number of ways, all achieve the same end solution and integrate with vSphere Web Client and Single Sign On.
- Installed on a Windows Server (Co-installed with vCenter Server)
- Installed on a Windows Server (Standalone)
- Virtual Appliance
Production deployments such use a SQL server (not SQL express or the embedded DB in the appliance).
I'm going to use the virtual appliance and the embedded PostgreSQL database in my lab. I had to choose one and as I understand vCO so far there are no gotcha's using the VA so I thought I'd go for that.
The virtual appliance weighs in at 2vCPU, 3GB vRAM and 12GB vDisk (Thick provisioned)
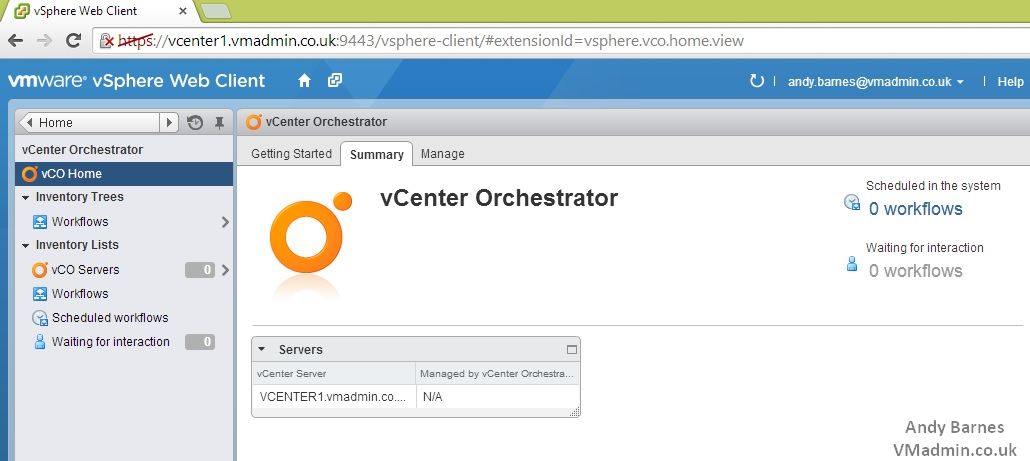
1. You may have noticed the vCenter Orchestrator plugin within the vSphere Web Client. Following the vCO icon takes you into vCenter Orchestrator with 0 vCO servers and no workflows.
I'm going to deploy the vCO virtual appliance and the end result after part 1 and part 2 will be a fully configured and integrated vCO server ready to run workflows.
2. Download the vCO Server Virtual Appliance
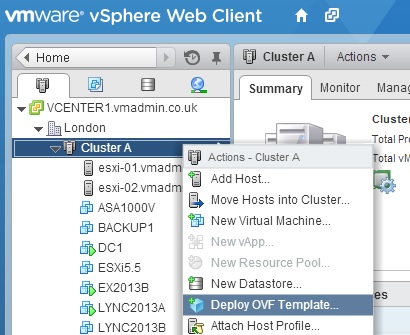
3. Deploy the vCO .ova template to the ESXi host or cluster.
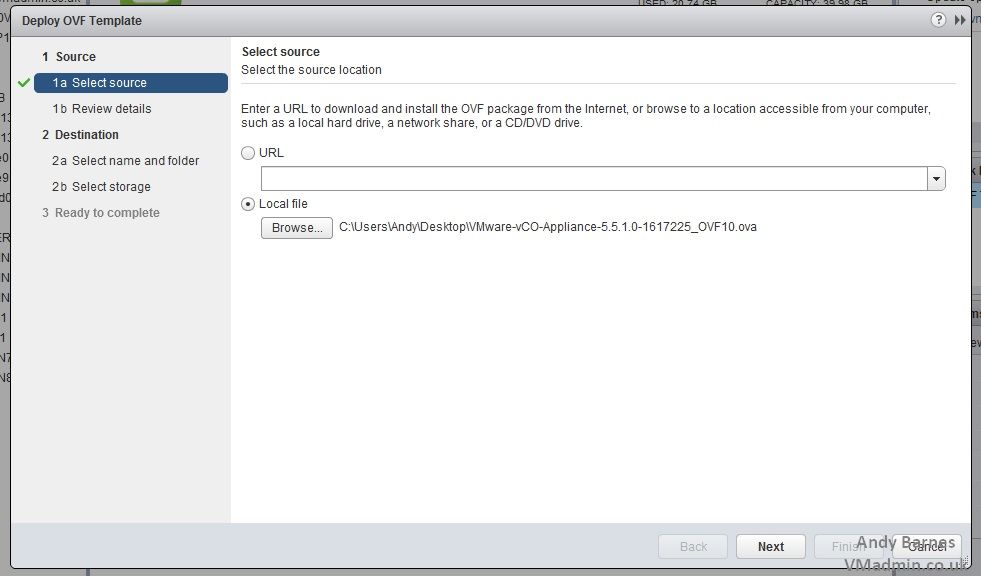
Note: You will need the Integration Client Plugin installed.
4. Select the .ova file, Next.
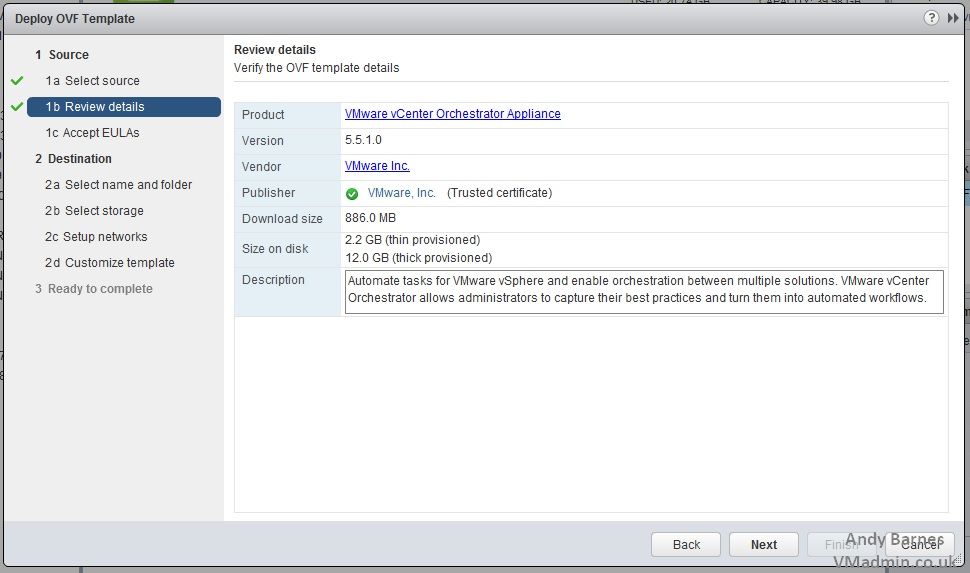
5. Check the vCO version and size on disk, Next.
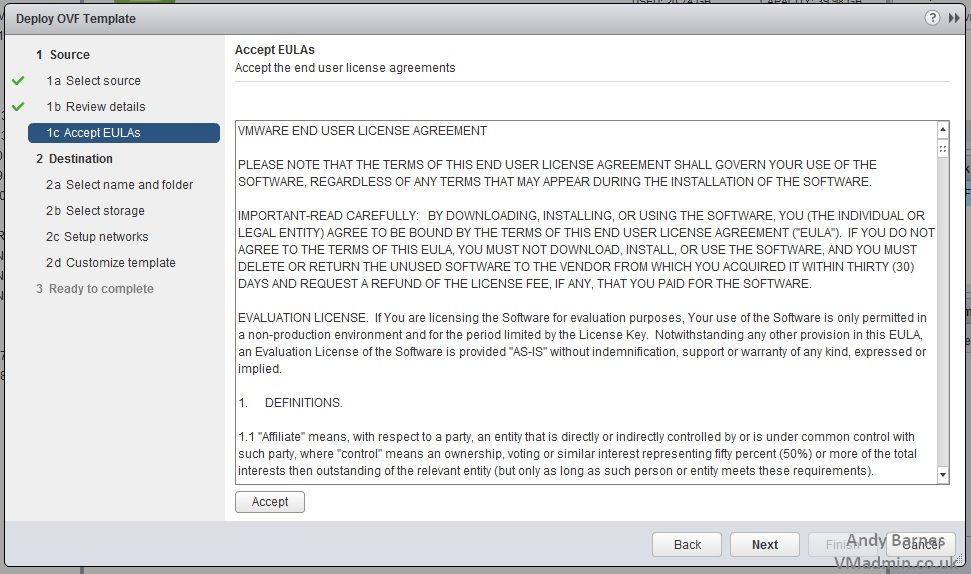
6. Accept the EULA (Click Accept), Next.
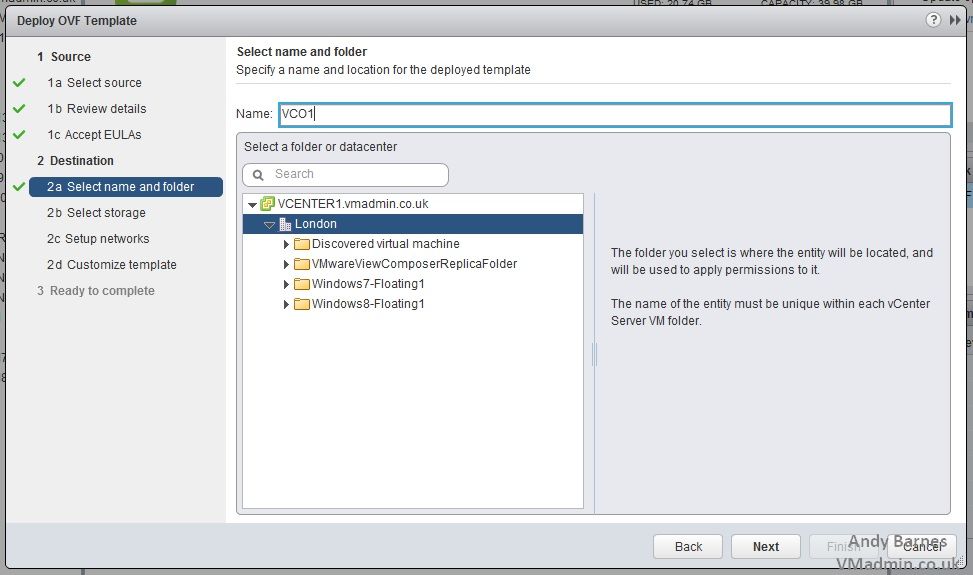
7. Give the vCO VA a name (I chose VCO1), select a DC or folder, Next.
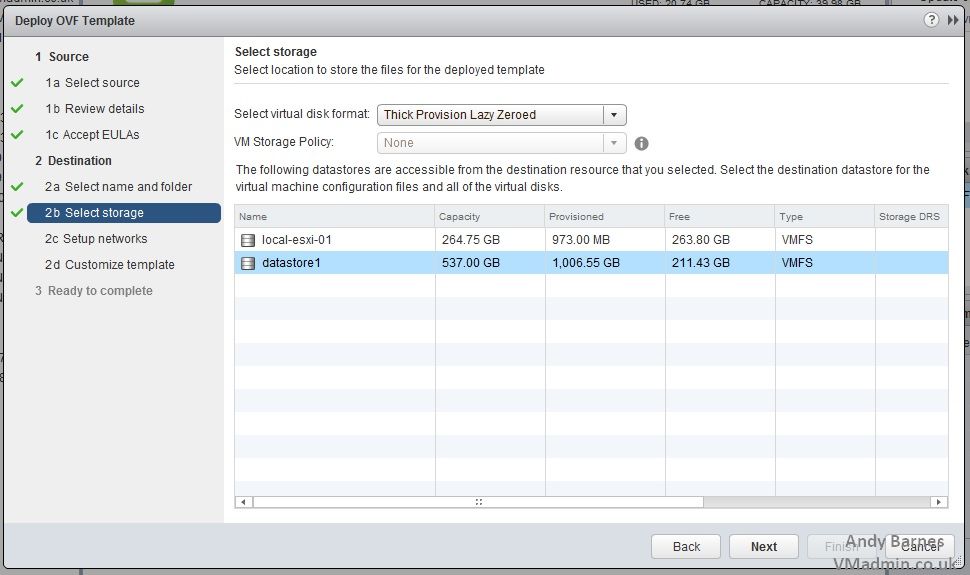
8. Select Thick or Thin provisioned disk and the datastore to deploy to, Next.
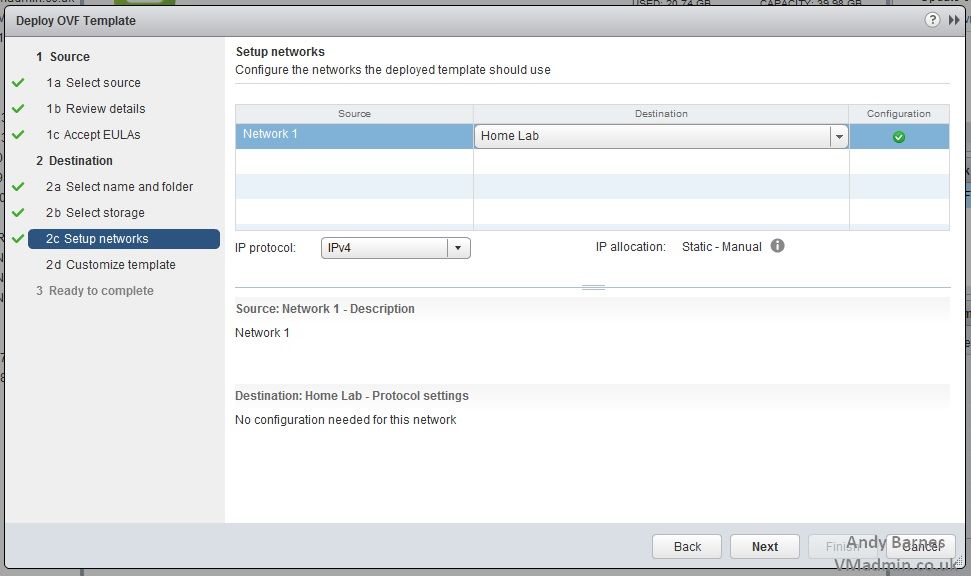
9. Select the network to connect to and choose IP protocol IPv4, Next.
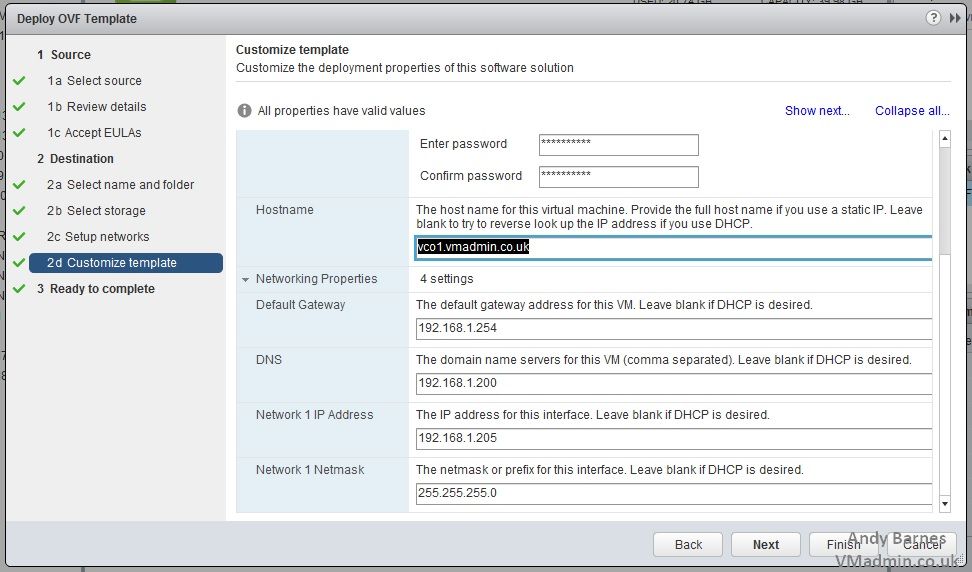
10. Enter a complex password (8 chars, include UPPER, lower, number and spec!al char)
11. Enter the Default GW, mask, IP address and DNS server IP.
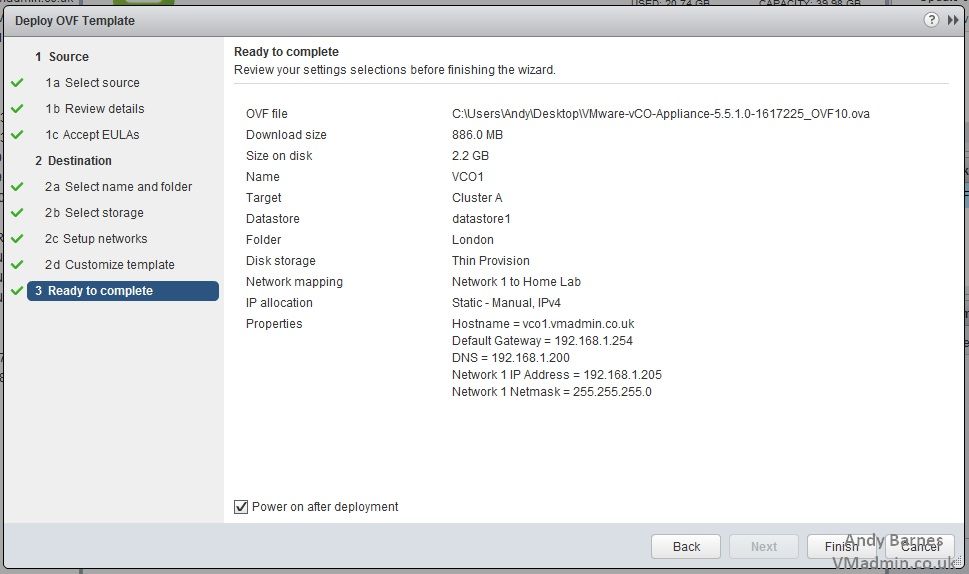
12. Review your settings, tick "Power on after deployment" and Click Finish!
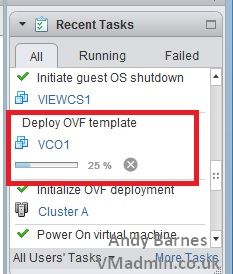
13. You will see the "Deploy OVF template" task run, this will take several minutes.
14. While you wait for it to deploy create a DNS A record for your vCO appliance (e.g. vco1.vmadmin.co.uk)
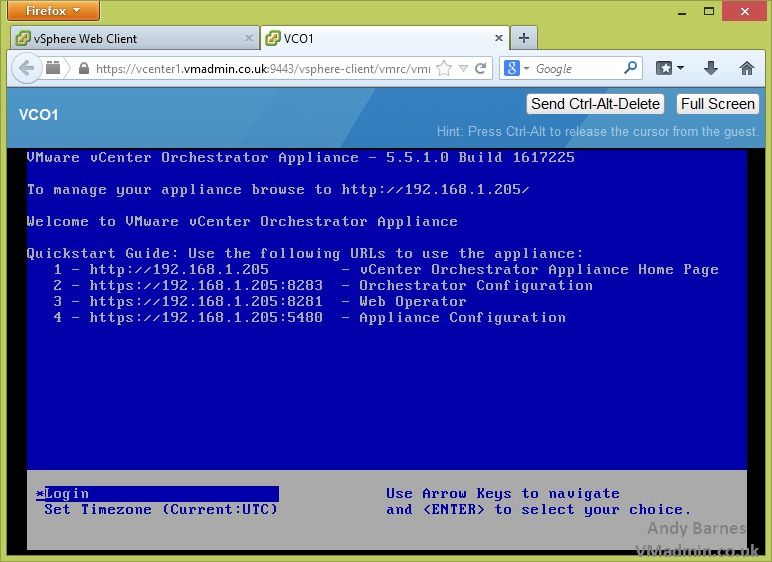
15. Once the vCO virtual appliance has finished deploying it will power on.
Checking the console you will see that the appliance has booted and has the correct IP address, we are now ready to configure the appliance and vCO.
Note: Check you can ping the DNS name you created earlier (e.g. vco1.vmadmin.co.uk)
Next up Part 2..
If you missed any of the previous parts of the series or want go back here is the jump list:
- vCenter Orchestrator (vCO) 5.5 - Part 1 Deploying the Virtual Appliance
- vCenter Orchestrator (vCO) 5.5 - Part 2 Configuring vCO
- vCenter Orchestrator (vCO) 5.5 - Part 3 Using vCO and Running a Workflow
- vCenter Orchestrator (vCO) 5.5 - Part 4 Adding a Workflow to a Context Menu
Share this blog post on social media:
Tweet


Latest Blog Posts
- vSphere 7 U1 - Part 3 - Creating a Datacenter, HA/DRS Cluster and Adding a Host
- vSphere 7 U1 - Part 2 - Deploying vCenter 7.0 U1 VCSA
- vSphere 7 U1 - Part 1 - Installing ESXi 7.0 U1
- Veeam CBT Data is Invalid - Reset CBT Without Powering Off VM
- View Administrator Blank Error Dialog/Window After Upgrade