XenDesktop is a VDI solution from Citrix to deliver Windows desktops to users anywhere on a wide range of devices. It can deliver high definition desktops to a range of different user types securley an integrates with other Citrix products such as XenApp and Access Gateway.
The latest version of XenDesktop 5.5 brings HDX-related new features and enhancements, including second generation Flash Redirection, Windows Media Redirection, Multi-Stream ICA including UDP for Audio, and Windows 7 Aero Redirection. See XenDesktop 5.5 Whats New for full details on new features.
The components that make up XenDesktop:
- Desktop Delivery Controller (DDC)
- Web Interface (WI)
- License Server
- Database Server
- Desktop Studio
- Desktop Director
-
Virtual Desktop Agent (VDA)
All components can all be installed on a single server with the exception of the Virtual Desktop Agent (VDA) that is installed in the master desktop image.
Additional Required Components:
- Virtual Infrastructure (XenServer, vSphere or Hyper-V) * vSphere 5.0 and XenServer 6.0 are supported with XenDesktop 5.5
- Active Directory
- DHCP Server
Desktop Delivery Controller (DDC):
- Microsoft Windows Server 2008, Standard or Enterprise Edition, with Service Pack 2 installed (32- and 64-bit)
- Microsoft Windows Server 2008 R2, Standard or Enterprise Edition (64-bit only)
.Net
IIS
Microsoft Visual J#
Microsoft Visual C++
Microsoft Windows Powershell 2.0
Database Server:
- Microsoft SQL Server 2008 R2
- Microsoft SQL Server 2008 R2 Express Edition (this is installed automatically)
- Microsoft SQL Server 2008 with Service Pack 1 or later
Both 32- and 64-bit versions are supported in stand-alone, clustered and mirrored mode (except for SQL Server 2008 R2 Express, which is supported in stand-alone mode only).
You must use Windows authentication when connecting from XenDesktop 5 to a SQL database.
In the installation below all components will be installed on a single server, however you may opt to install one role per server to scale the environment for a larger number of desktops. It is also possible to install more than one Desktop Delivery Controller (DDC) and Web Interface server (WI) to both scale and introduce high availability of core components.
To install XenDesktop you will need the installation ISO media from http://www.citrix.com/download there is a 30 day free trial that does not require a license. After this trial expires you will need to buy a license and an import it into the license server.
The editions of XenDesktop are VDI, Enterprise and Platinum (see here for more info on Editions).
The first step is to install the Desktop Delivery Controller (DDC).
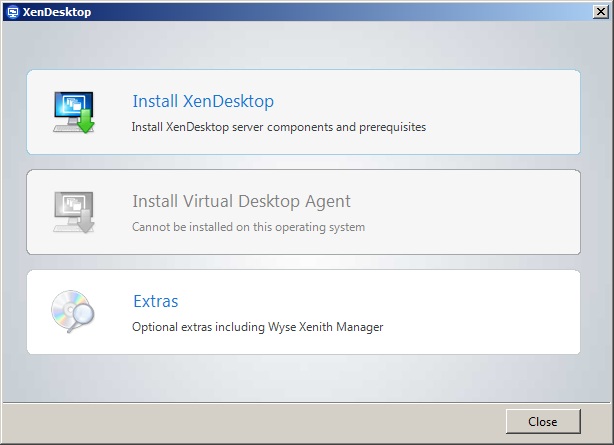
1. Insert the XenDesktop CD or mount the ISO to your VM.
Once the autorun has started click "Install XenDesktop"
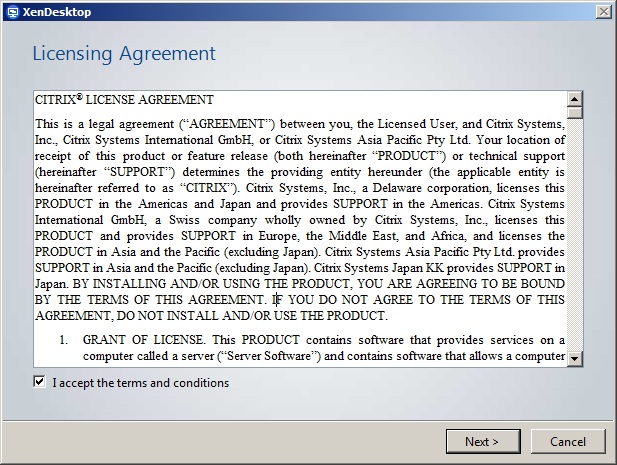
2. Read and Accept the license agreement.
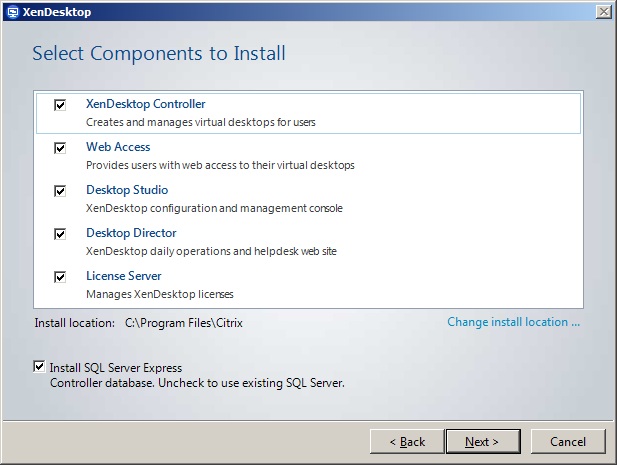
3. Select the components you want to install.
In this example our DDC is going to provide all of the roles, so essentially we are running XenDesktop on a single server (plus the hypervisors).
We will also install SQL Express, however a full install of SQL Server (local or remote) can be used.
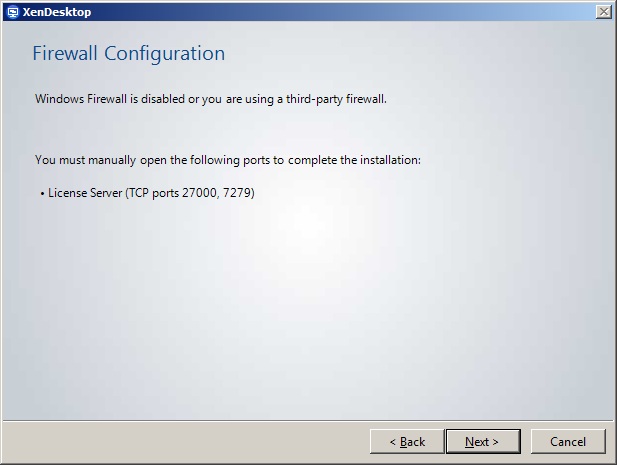
4. I have the windows firewall disabled on this server, but if it was running the following ports would need opening for the license server as noted.
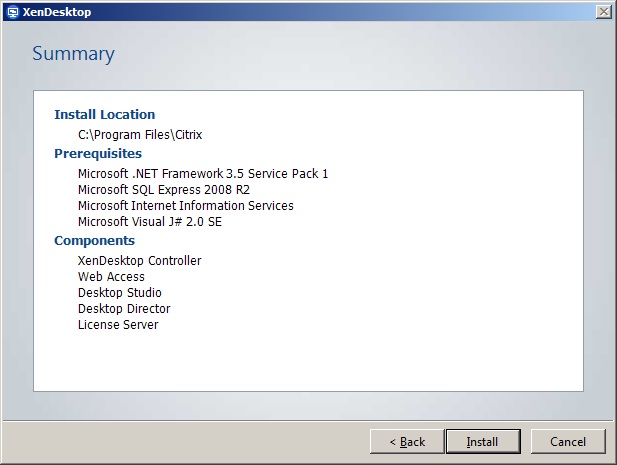
5. Check the installation summary such as install location and roles, then begin the install.
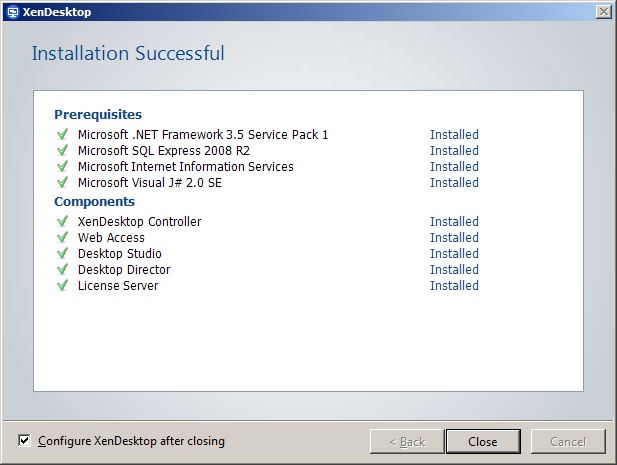
6. Once the installation is complete close the wizard and configure XenDesktop (make sure the box is checked) .
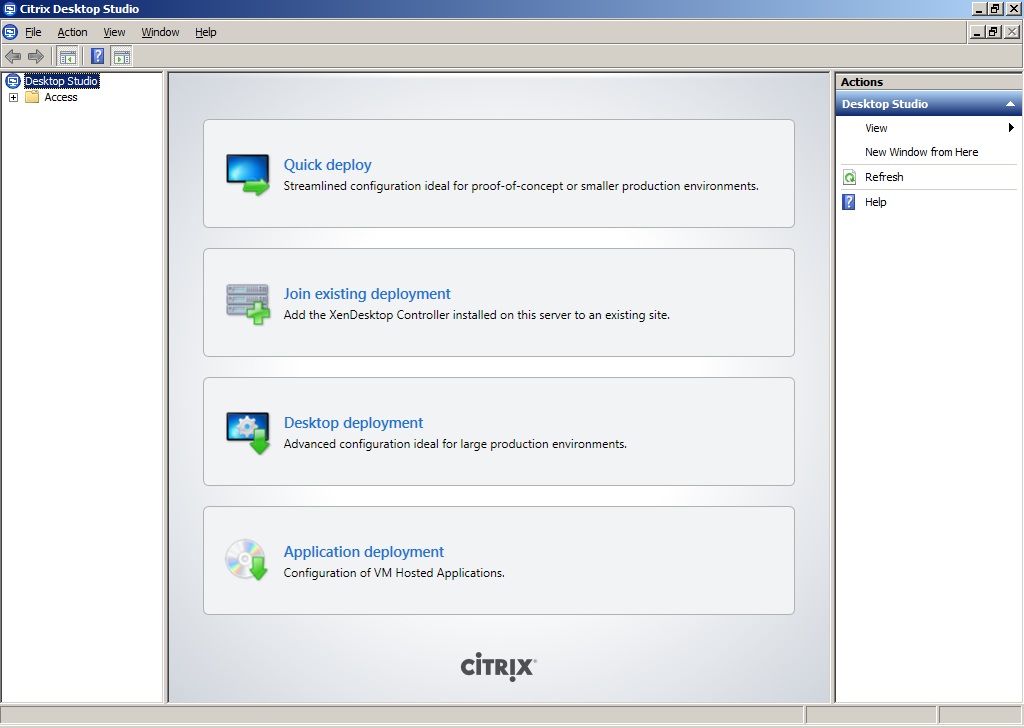
7. Desktop Studio will open and the initial actions screen will be displayed.
I would advise against quick deploy unless this is a very quick and dirty deployment as it limits the configuration options.
Click "Desktop Deployment" which will lauch the wizard.
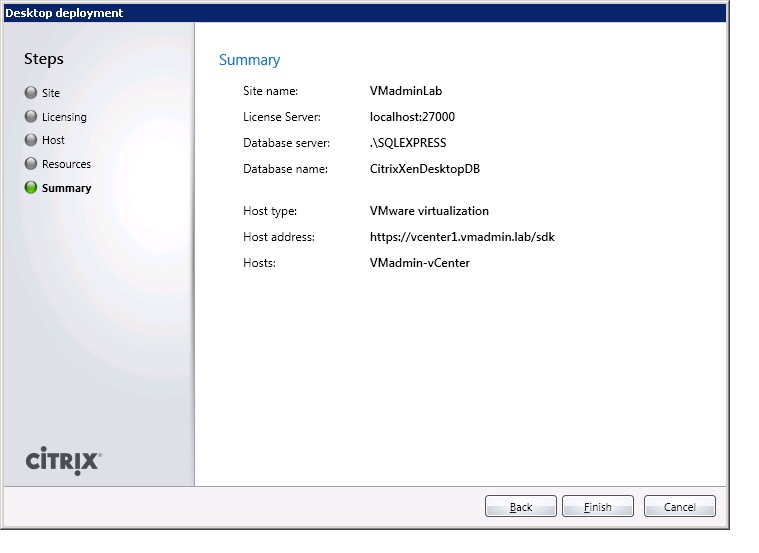
8. Give the site a name and choose "Default database" for the database (unless you are using another server).

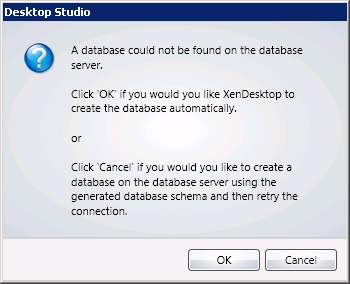
9. The wizard will prompt to create the XenDesktop database on the database server. Click OK and XenDesktop will create this for you. Optionally you can use the schema and create it manually.
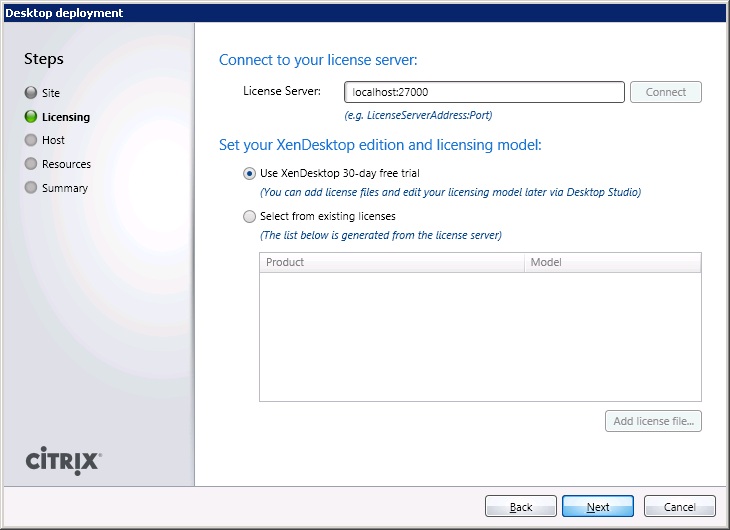
10. Enter the license details for the server (localhost in this case) and edition (trial in this case).
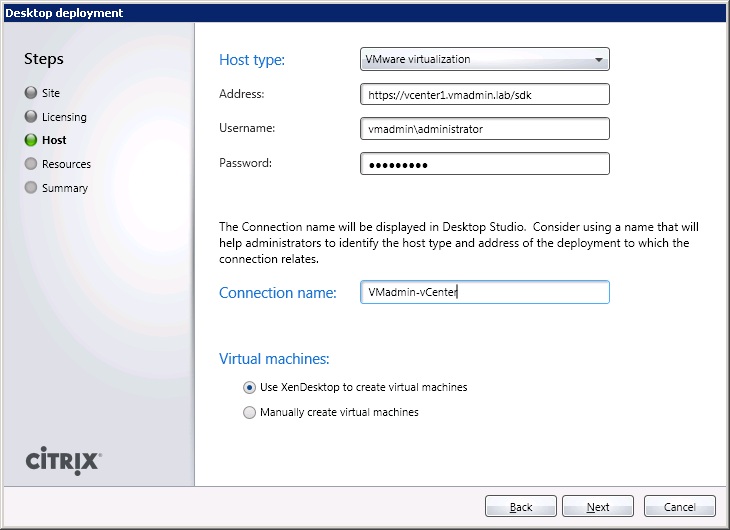
11. Now for the hypervisor you have a choice of XenServer, vSphere or Hyper-V.
Here I am using vSphere 5. Note there is currently an issue if using XenDesktop with vSphere that has distributed virtual switches.
You will also come across the following vSphere SSL Issue - Object reference not set to an instance of an object
Enter the required vCenter server and credentials, and select use XenDesktop to create virtual machines.
This will use Machine Creation Services (MCS) to create the number required virtual machines from a master image (at a later stage).
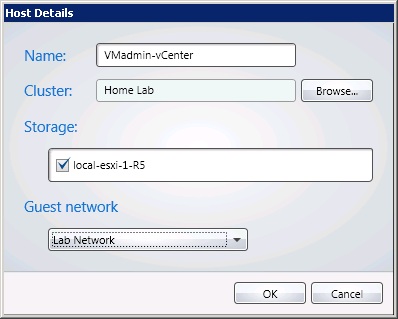
12. Give the virtualisation host/cluster a suitable name and select the storage and network(s) you want to use in XenDesktop.
Here I have one local VMFS datastore and the Lab Network.
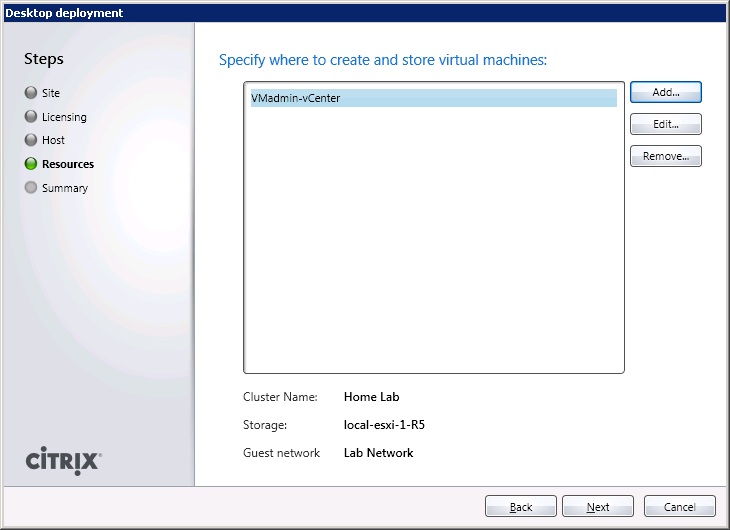
13. Under resources select the virtualisation host you created where XenDesktop will create the VMs.
14. Verify the site details are correct and click Finish.
15. You will now be taken back to the initial configuration page with the first part of the configuration completed.
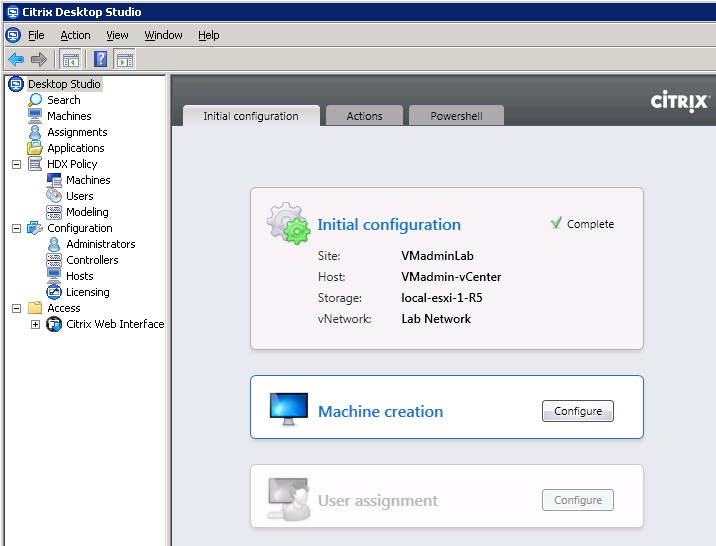
The next step is to configure Machine Creation Services (MCS)
See XenDesktop 5.5 Creating a Catalog
Share this blog post on social media:
Tweet


Latest Blog Posts
- vSphere 7 U1 - Part 3 - Creating a Datacenter, HA/DRS Cluster and Adding a Host
- vSphere 7 U1 - Part 2 - Deploying vCenter 7.0 U1 VCSA
- vSphere 7 U1 - Part 1 - Installing ESXi 7.0 U1
- Veeam CBT Data is Invalid - Reset CBT Without Powering Off VM
- View Administrator Blank Error Dialog/Window After Upgrade